Avoid These Common Slip-Ups When Using 3D Gaming Tumbler & Gamer 20 Oz Skinny Sublimation Designs
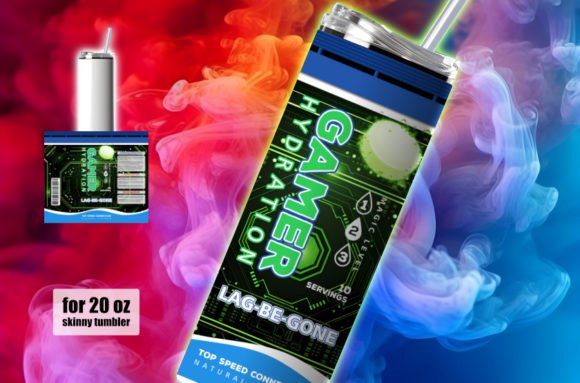
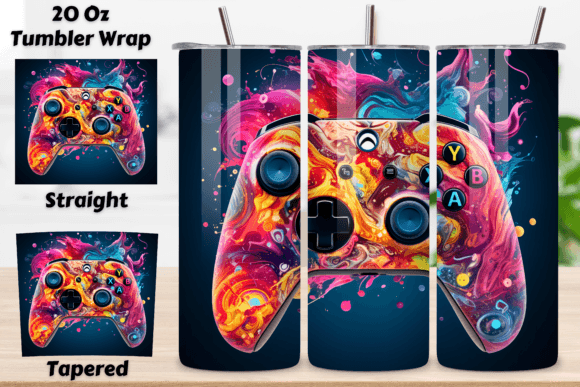
Custom drinkware has exploded in popularity, and the 3D Gaming Tumbler and Gamer 20 Oz Skinny designs are at the heart of that trend. These aren’t physical tumblers waiting to be shipped. What you’re really getting is a carefully created set of digital PNG files, purpose-built for sublimation printing. The download includes two distinct wraps: one for a straight 20oz skinny tumbler and one for a tapered version. Each file measures 9.3 x 8.2 inches at a crisp 300 DPI, giving you everything you need to press a vibrant, professional-looking tumbler. The catch? A flawless finished product depends on more than just having the artwork. The way you prepare, print, and press these designs makes all the difference, and a handful of easily overlooked details can turn your project from a showpiece into a disappointment.
Whether you’re a hobbyist making one-off gifts, a small business owner building a product line, or a content creator teaching others, you’ll get the most value from these PNGs when you sidestep the errors that quietly eat away at quality. Let’s pull back the curtain on the mistakes no one warns you about and map out a workable path to consistent, sharp results.
When a “One-Size-Fits-All” Mentality Backfires
It’s tempting to assume that a tall, skinny 20oz tumbler is just a tall, skinny 20oz tumbler. In reality, the market is split between straight-walled and tapered blanks. The straight version has parallel sides from top to bottom, while the tapered tumbler gradually narrows. This difference might seem subtle on a shelf, but it creates a huge mismatch when you wrap a full-coverage design. Many first-time buyers grab one PNG file at random, print it, and forge ahead without checking the template against their actual blank.
The result? A design that buckles at the bottom edge, a visible unprinted sliver, or a graphic that looks pinched. On a straight wrap printed and pressed onto a tapered tumbler, the bottom of the image will stretch and distort because the substrate’s circumference doesn’t match the artwork’s intended shape. The reverse scenario — a tapered wrap on a straight blank — leaves unsightly gaps or forces you to trim away parts of the design you wanted to keep. Neither outcome screams “premium gaming accessory.”
Better approach: Before you even hit “print,” identify your tumbler’s profile. If you’re unsure, use a flexible measuring tape to check the top and bottom circumferences. Are they identical? Stick with the straight PNG. Is the bottom smaller? Reach for the tapered file. The beauty of this particular Gamer 20 Oz Skinny set is that you get both versions, so there’s no reason to guess. Print a low-cost paper test of each and wrap them around the blank to see which one hugs the surface without creasing or stretching. Keep in mind that even among tapered tumblers, subtle differences exist across brands; a design that fits one manufacturer’s blank perfectly might still need a tiny adjustment for another. When it’s close but not perfect, a minuscule resize in your print settings — often no more than 1–2% — can tidy up the fit without noticeably degrading the 300 DPI sharpness.
Overlooking the Print Dialogue Details
High-resolution artwork doesn’t automatically translate to a high-resolution transfer. A surprisingly common misstep involves the print settings themselves. Someone downloads the 9.3 x 8.2 inch PNG, sees it’s at 300 DPI, and sends it straight to the printer. But if the printer driver, design software, or system dialog rescales the image to “fit to page” or uses an unexpected colour profile, the final sublimation print can emerge soft, muted, or incorrectly sized.
This is more than a minor annoyance. When a design prints at even 5% smaller than intended, the edges don’t align with the tumbler’s recommended wrap zone, leaving the seam exposed. Colours also suffer: sublimation ink requires specific ICC profiles to achieve that 3D Gaming Tumbler pop. Without the correct profile, the vibrant neon greens and deep blacks that define a great gamer aesthetic can turn muddy or flat after pressing. The blank’s coating matters, too. Some budget tumblers have uneven or thin polyester coating, which starves the dye and produces a faded, scratchy-looking image regardless of how good the PNG file is.
Correct this before you waste a blank:
- Verify dimensions: Open the PNG in your software, confirm the document size is exactly 9.3 x 8.2 inches, and print at 100% scale — no scaling, no “fit.”
- Mirror your image: This one still trips up even experienced crafters. Sublimation transfers must be mirrored; if you forget, every bit of text and directional artwork will appear backwards on the tumbler.
- Use the right ICC profile: If your printer manufacturer provides one for your ink-and-paper combination, apply it. Otherwise, test with a small swatch print before committing to the full wrap.
- Evaluate your blanks: Not all tumblers sold as “sublimation-ready” accept dye equally well. Consider ordering a sample pack first and pressing a small test strip of the design onto an inconspicuous area. A reputable blank will yield rich colour in under 60 seconds; a poor one will look weak no matter how great the artwork is.
Let’s say you’re running a small online shop and you want your Gamer 20 Oz Skinny tumblers to match the neon-lit aesthetic your customers expect. If you skip the colour profile check and use a generic setting, those cyberpunk purples might come out as dull mauves. The customer may not actively complain, but they won’t reorder or recommend you either. Taking fifteen extra minutes to dial in your print settings pays off in repeat business.
Heat Press Errors That Sabotage an Otherwise Perfect Print
Even when the digital file is right and the print looks crisp on paper, the transfer can still go wrong under the heat. The most frequent culprits are inconsistent pressure, incorrect temperature, and poor positioning. Because a skinny 20oz tumbler has a smaller diameter than wider variants, heat needs to permeate the coating evenly across the entire circumference. Uneven pressure — often caused by a press platen that doesn’t match the tumbler’s curve or by over-tightening the clamp in one spot — leads to faint patches or a visible dark line where pressure peaked.
Temperature misreadings are another stealthy problem. Many tabletop tumbler heat presses have dial controls that aren’t precision-calibrated. If the press runs 10–15 degrees hotter than displayed, the sublimation inks can gas off too aggressively, blurring fine details in the 3D Gaming Tumbler artwork and leaving a “blown out” look. Too cool, and the dye never fully bonds, resulting in a design that scratches off or fades after a few hand-washes.
How to press with confidence:
- Pre-heat the blank for a few seconds to drive out any moisture, which can cause pin-prick spots in the transfer.
- Position the printed wrap so the design sits exactly where you want it relative to the tumbler’s top and bottom rims. Use heat-resistant tape along all edges, but avoid stretching the paper so much that it warps the image.
- If your press allows, rotate the tumbler in stages rather than pressing the entire circumference in one go. This ensures even dwell time under the heating element and reduces the risk of ghosting.
- Invest in a separate digital temperature gun to verify your press’s actual heat. Adjust the dial until the readout matches the real thermal reading, then mark that spot for future use.
- After pressing, let the tumbler cool completely inside a protective sleeve or gently on a rack. Not only does this prevent accidental smudging, it also lets the coating settle, locking in the crisp 300 DPI detail you worked hard to preserve.
Real-world example: A crafter once pressed a batch of ten gamer tumblers for a convention. Every single one had a subtle double image — a ghostly shift of about one millimetre — because the wrapping paper slipped when the press opened. They had used lightweight masking tape instead of proper heat tape. A simple switch to high-temperature polyimide tape and a habit of pressing in two or three rotational steps eliminated the issue entirely. Those tiny adjustments are what separate a “homemade” look from a store-ready product.
Thinking the Creative Work Stops After Downloading
These designs are called sublimation-ready, and they absolutely are, but that doesn’t mean you’re restricted to the exact look of the provided PNG. Some crafters mistakenly believe they must use the file as-is or that any alteration will ruin the quality. Others go too far the other direction, enlarge a low-resolution web graphic, and slap it onto the template, then wonder why the print came out pixelated.
The middle ground is where the best results live. The 9.3 x 8.2 inch canvas at 300 DPI gives you plenty of resolution headroom to add a customer’s gamer tag, a small team logo, or a subtle overlay effect without degrading the original artwork. When adding elements, make sure any imported graphics are also 300 DPI at the intended print size, and keep critical details within the safe zone — typically a quarter-inch inside the document’s trim edges — so they don’t get clipped by the top or bottom rim of the tumbler.
If you’re crafting tumblers for a community like a Twitch subscriber group or an esports club, personalisation is a huge value-add. But that personalisation only enhances the tumbler if the underlying design remains intact and aligned. A common misjudgment is placing additional text right at the seam; even a perfectly wrapped tumbler has a nearly invisible join, and text crossing that boundary becomes difficult to read. Arrange any custom elements so they fall fully on the front-facing portion of the wrap, and use the original artwork’s colour palette to keep the composition cohesive.
Things to Check Before You Even Buy
If you haven’t purchased the 3D Gaming Tumbler and Gamer 20 Oz Skinny PNG pack yet, a quick audit of your setup will save you downstream frustration. First, remember this is a digital-only product. No physical item will land on your doorstep. You’re paying for the design files, which means you need to source your own sublimation blanks, ink, transfer paper, heat tape, and a tumbler press or oven setup. If you’re brand new to sublimation and think you’re buying a finished tumbler, this can lead to an awkward exchange later.
Second, confirm your printer is actually capable of sublimation. Many inkjet printers cannot use sublimation ink without a dedicated conversion. Third, even with the right printer, the maximum printable width must accommodate a 9.3-inch tall design. Most standard letter-sized printers can manage this when fed with appropriate 8.5x11 or larger transfer paper, but double-check your paper guides and driver settings. Finally, consider whether you need both the straight and tapered versions. Even if you currently only stock straight blanks, having the tapered file on hand future-proofs your product line and stops you from scrambling later if a customer requests that specific shape.
The Gamer 20 Oz Skinny trend shows no sign of slowing down, and high-quality artwork is the foundation. But a great PNG file only reaches its potential when the hands crafting it understand the process end to end. By sorting out your template choice, print settings, pressing technique, and personalisation approach upfront, you’ll turn out tumblers that not only look sharp but also hold up to everyday use. Those are the pieces that get shown off on social media, recommended in Facebook groups, and reordered again and again — and that’s the kind of outcome that makes the learning curve worthwhile.